|
|
| [ TechGuys ] | [ Forum ] | Polish Plastic Lenses | [ Projects ] | [ How To ] | [ Email ] | [ Links ] |
If you've ever spent a weekend detailing a car, you know some of the many boring, tedious touches that make the difference between a good wash + wax job and a great wash + wax job. One of the key elements to a good detailing job is removing left-over wax and road debris from various raised surfaces of your car. How many of you have remembered to clean your plastic lenses with a toothbrush to remove the grime from around the lettering? It makes a noticeable difference! Now, you will no longer have to worry about the lettering!
| Tools / Resources: | Consumables: |
|
|
As fair warning, the following modifications are irreversible. If you are worried that removing the lettering from the lenses will result in your inability to prove that the lenses are in fact D.O.T. legal, we recommend that you take detailed photos (macro + normal) of the lenses you will be working on - this can prevent problems should you be required to prove your lights are road legal.
| First step will be to remove the lenses from your vehicle.
Mounting and fasteners will vary by make and model so be sure to take your
time and proceed with caution. This will ensure you do not damage
your lenses. Be sure that you collect any loose fasteners and/or mounting hardware as to not lose any critical parts. Now is a good time to consider replacing all exterior lights as a precaution if you have a few dollars to spare. |
[click for larger image] figure 1 |
|
[click for larger image] figure 2 |
Assemble all of your lenses and equipment in your work
area. Ideally, you should work near a source of running water to
facilitate proper wet sanding of the lenses. Polishing your lenses has the potential to be messy - it all depends on how organized you are so be aware of this when you select your workspace. |
We selected the following grits of sand paper for our lens
polishing project:
You could start as coarse as 240 grit if you like .. just be sure not to remove too much material whilst you sand. Also, you should be cautious about skipping too many stages of grit .. it can lead to more work than necessary. To speed things up, be sure to also use 1000 grit sand paper - we opted to skip 1000 but really shouldn't have. |
[click for larger image] figure 3 |
|
[click for larger image] figure 4 |
When you are done sanding, you will require some form of
paste polish. The polish we selected has given us great results in
the past, so we will stick with what we know works. If you are not sure what to use + when, contact the manufacturer for help with product selection and application. In regards to Meguiar's, start with #17 clear plastic cleaner and then follow up with #10 clear plastic polish. |
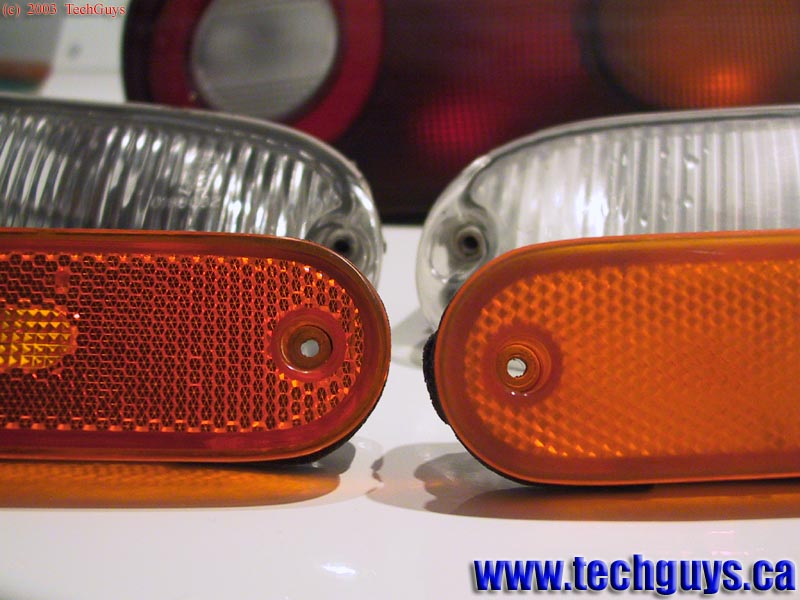
| This image illustrates the ugly lettering that we were
referring to in the introduction of this how to article. You may be skeptical right now but when this article is done, you will not believe how well this modification turns out. Removing the lettering really adds a nice clean look to any vehicle. First step will require that you sand the lenses with progressively finer grit sand paper. We started by sanding the entire lens surface with 400 grit to remove all small nicks and scratches on the lens. You do not need to sand the entire lens as it will increase your over-all work load however, we recommend that you sand the entire surface for a rejuvenation of all lenses.
|
[click for larger image] figure 5 |
|
[click for larger image] figure 6 |
Once you have sanded the entire surface with 400 grit sand
paper, move up to 800 (or similar) grit sand paper to remove all sanding
marks from the prior grit. Once all deep scratches from the previous
grit are smoothed out, change to 2000 grit sand paper and smooth the
surface even further. Be sure to use the wet-sanding technique during the entire sanding process. To do so, immerse the sand paper in water for 10 minutes before starting. Once the sand paper has had time to soak, begin lightly sanding the lens with the sand paper, making sure to dip the sand paper in the water often. Wet sanding allows for a smoother final surface and helps remove the debris from the abrasive - speeding up the sanding process. |
| Proper sanding will take perhaps an hour or more for all
your lenses - all depending on the extent of nicks and scratches, and how
many different grits you need to use On the left is an un-touched lens, on the right is a lens which has been completely sanded - from 400 to 2000 grit sand paper. Do not worry, you will have the freshly sanded lenses looking even better than they started out! Just be sure to take your time. |
[click for larger image] figure 6 |
|
[click for larger image] figure 7 |
When you are done sanding the lenses with 2000 grit sand
paper, use the plastic polish you have purchased in the proper order,
being sure to follow manufacturer's directions. This may take some
time, so be prepared. If you slack off in this step, the results
will be obvious so do a good job! Figure 7 illustrates the entire sanding and polishing process. Starting from top left - untouched lens, top right - 2000 grit sanding, bottom right - 800 grit sanding, bottom left - polished lens (following manufacturer's directions). |
| Once all of your lenses are sanded and polished to your
high standards, clean them up with a clean rag and prepare them for
re-installation. Now is a great time to install those new bulbs. Be sure you use all factory mounting hardware to ensure proper fitment. Also take note of where each lens is meant to be mounted - on some models, the lenses seem interchangeable but are in fact not. |
[click for larger image] figure 8 |
|
[click for larger image] figure 9 |
If you haven't already polished your lenses, go and have a
look at them and then compare them to figure 9. You should notice a
huge difference in both surface quality of the lens and the lack of the
tacky lettering. Polishing your lenses as we have done here will be immediately noticeable - especially on a well kept car. You wash and wax your car's paint meticulously so why not care for your lenses too? This modification adds a very nice touch of class. |
| We are sure you will love the results! It is also a good idea to take the lenses off the car every so often to re-polish them with the plastic polish to maintain the better-than-new appearance. |
[click for larger image] figure 10 |
|
If you feel that this article has been of any use to you, please consider
supporting the website by making a small donation.
For more info, simply click on the "Make a Donation" icon and you will be brought to a donation info page. Thanks! |
| [ TechGuys ] | [ Forum ] | Polish Plastic Lenses | [ Projects ] | [ How To ] | [ Email ] | [ Links ] |
(c) Copyright 2019 - James Buck - www.techguys.ca